Related Posts Plugin for WordPress, Blogger...

                   Follow Me on Pinterest


photo cards


OpenSky

Freckled Nest - Design by Kelly Ann

Home & Garden Blogs
BLOG DIRECTORY
Online Marketing
Home Improvement Blogs - BlogCatalog Blog Directory

Entries in DIY Projects (36)

Monday
Nov222010

True Value Blog Squad Challange - A Bed Fit for a King! Part 1 

So....we have been working on a new bed now for a while. When we took on the  DIY Blog Squad and the challenge to create new and exciting DIY projects, we committed to challenge ourselves - and we sure did with this one! The bed has been an exciting challenge to say the least! We started off looking to buy a bed, and couldn't find exactly what we wanted. After much research and inspecting the hundreds of beds we went to look at, Joey announced "I can build this!"......and the mission began!

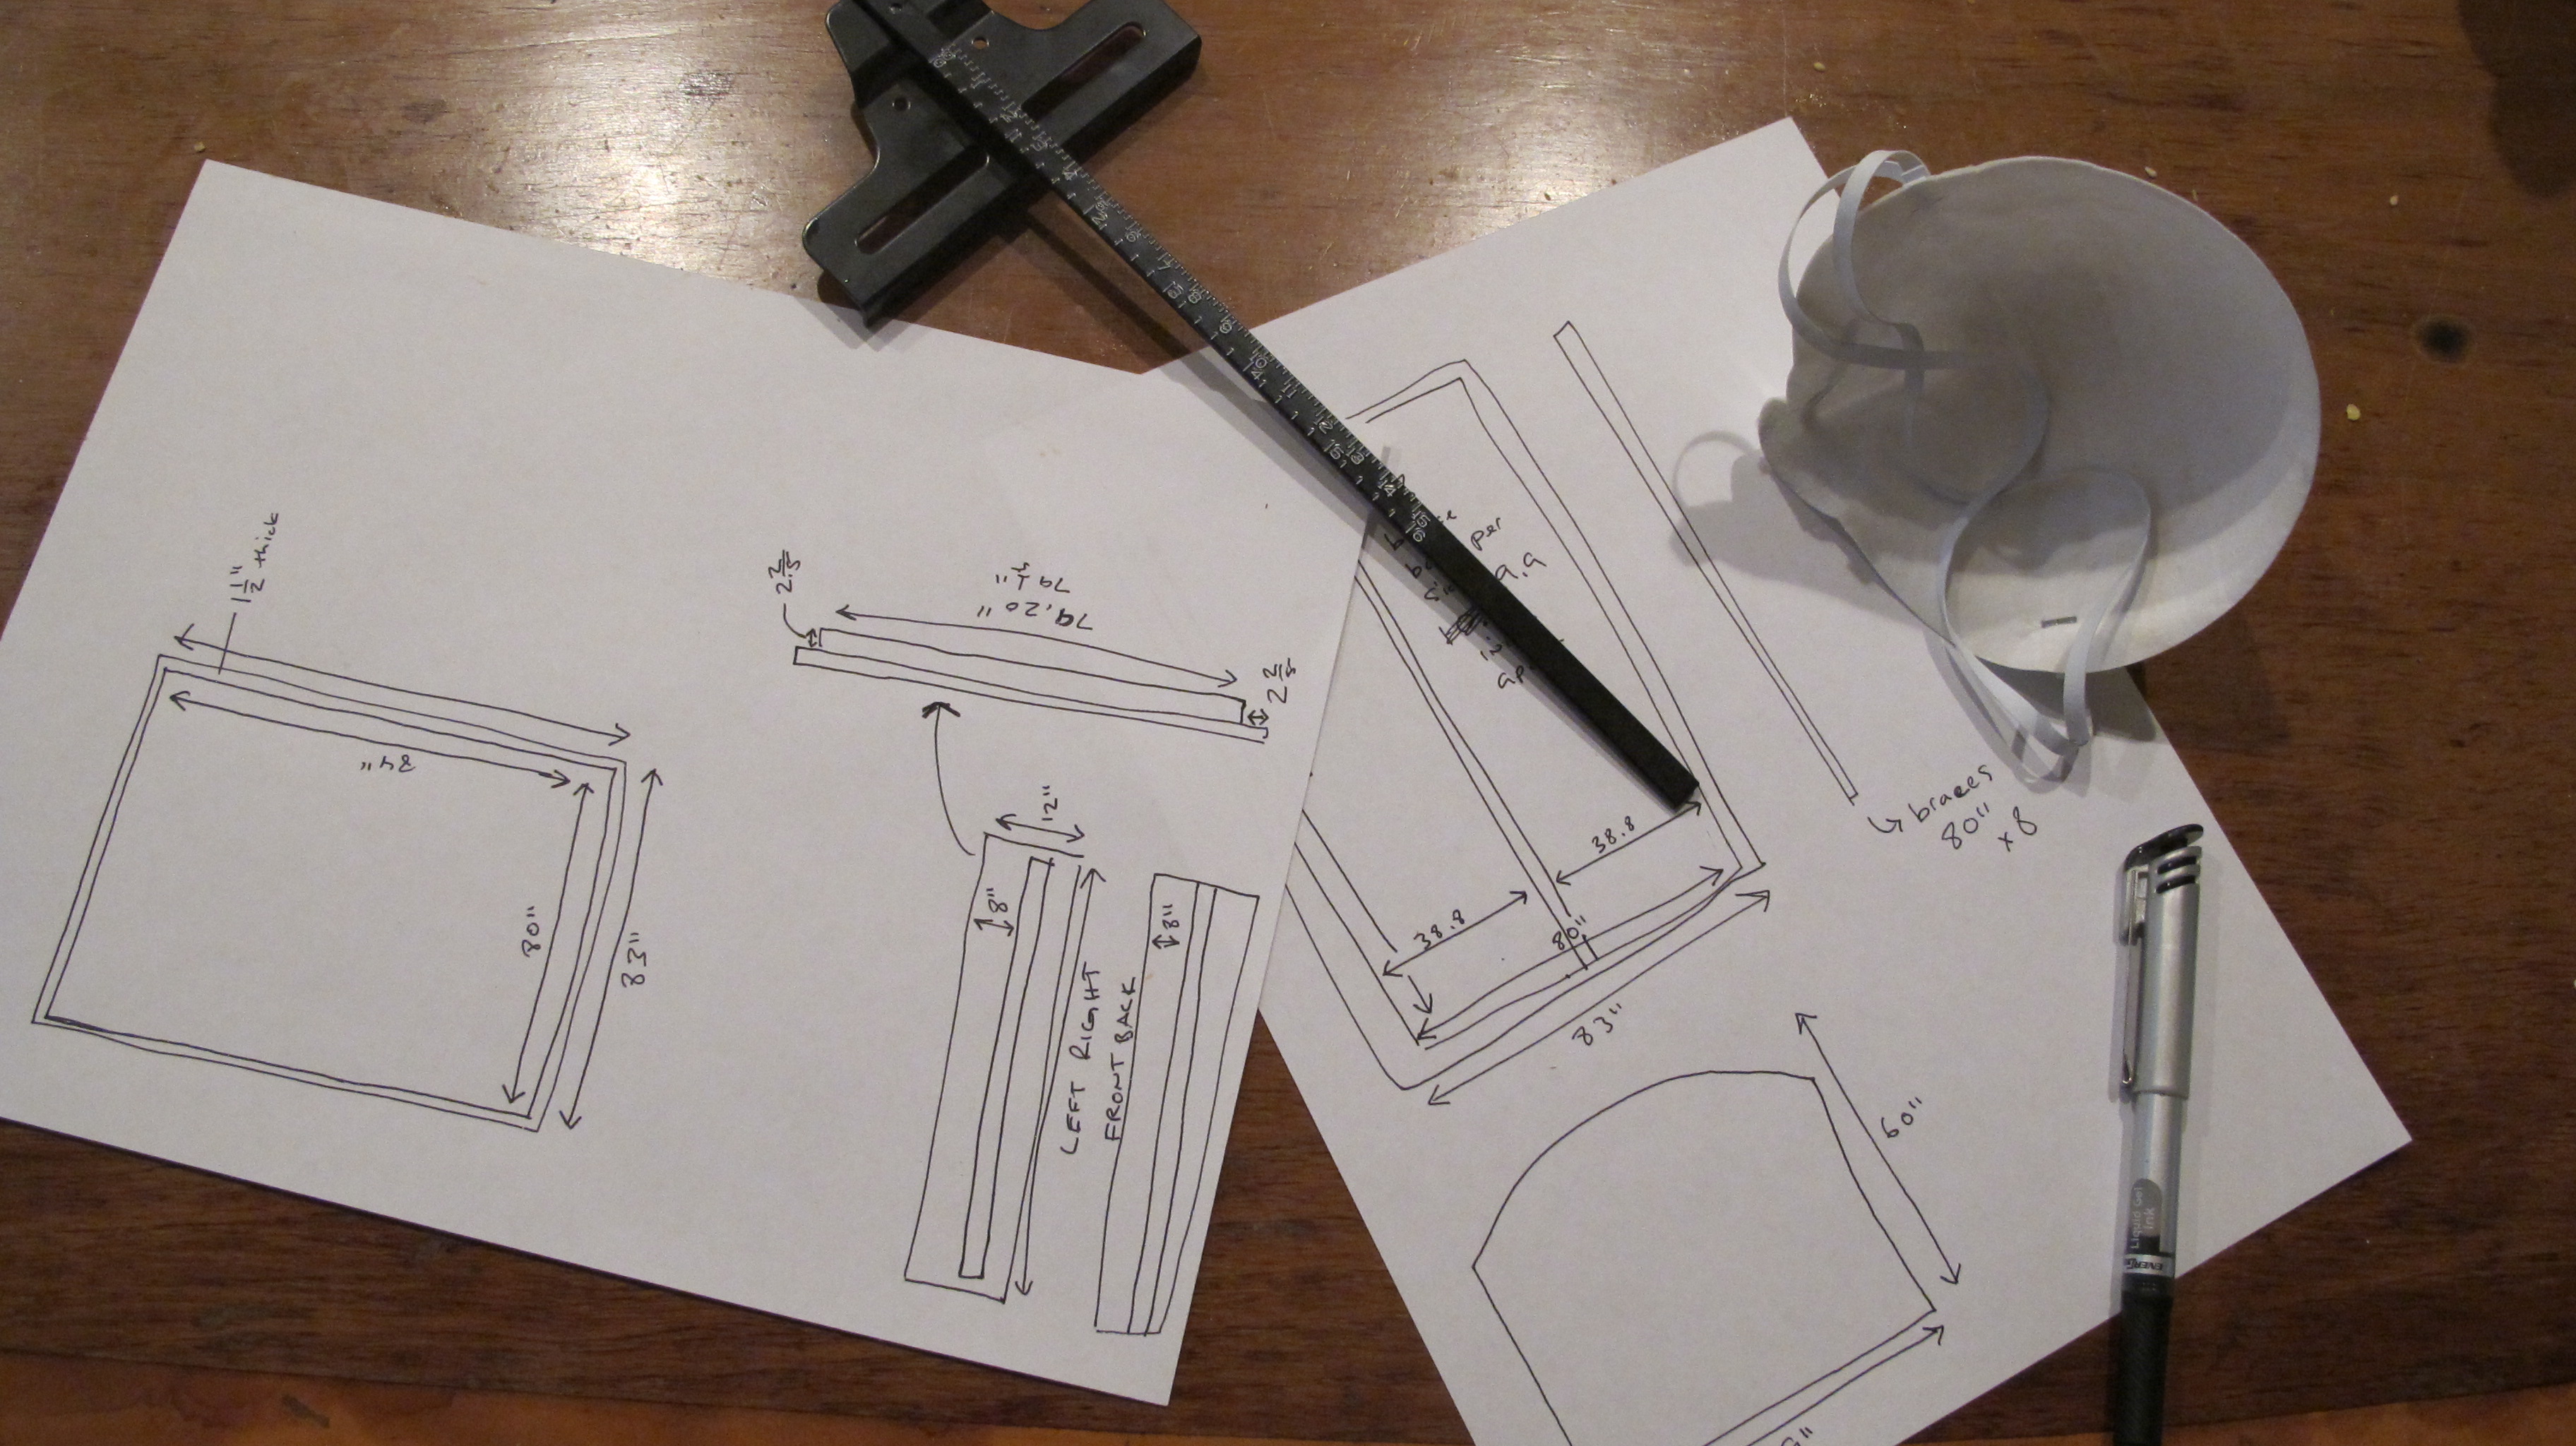
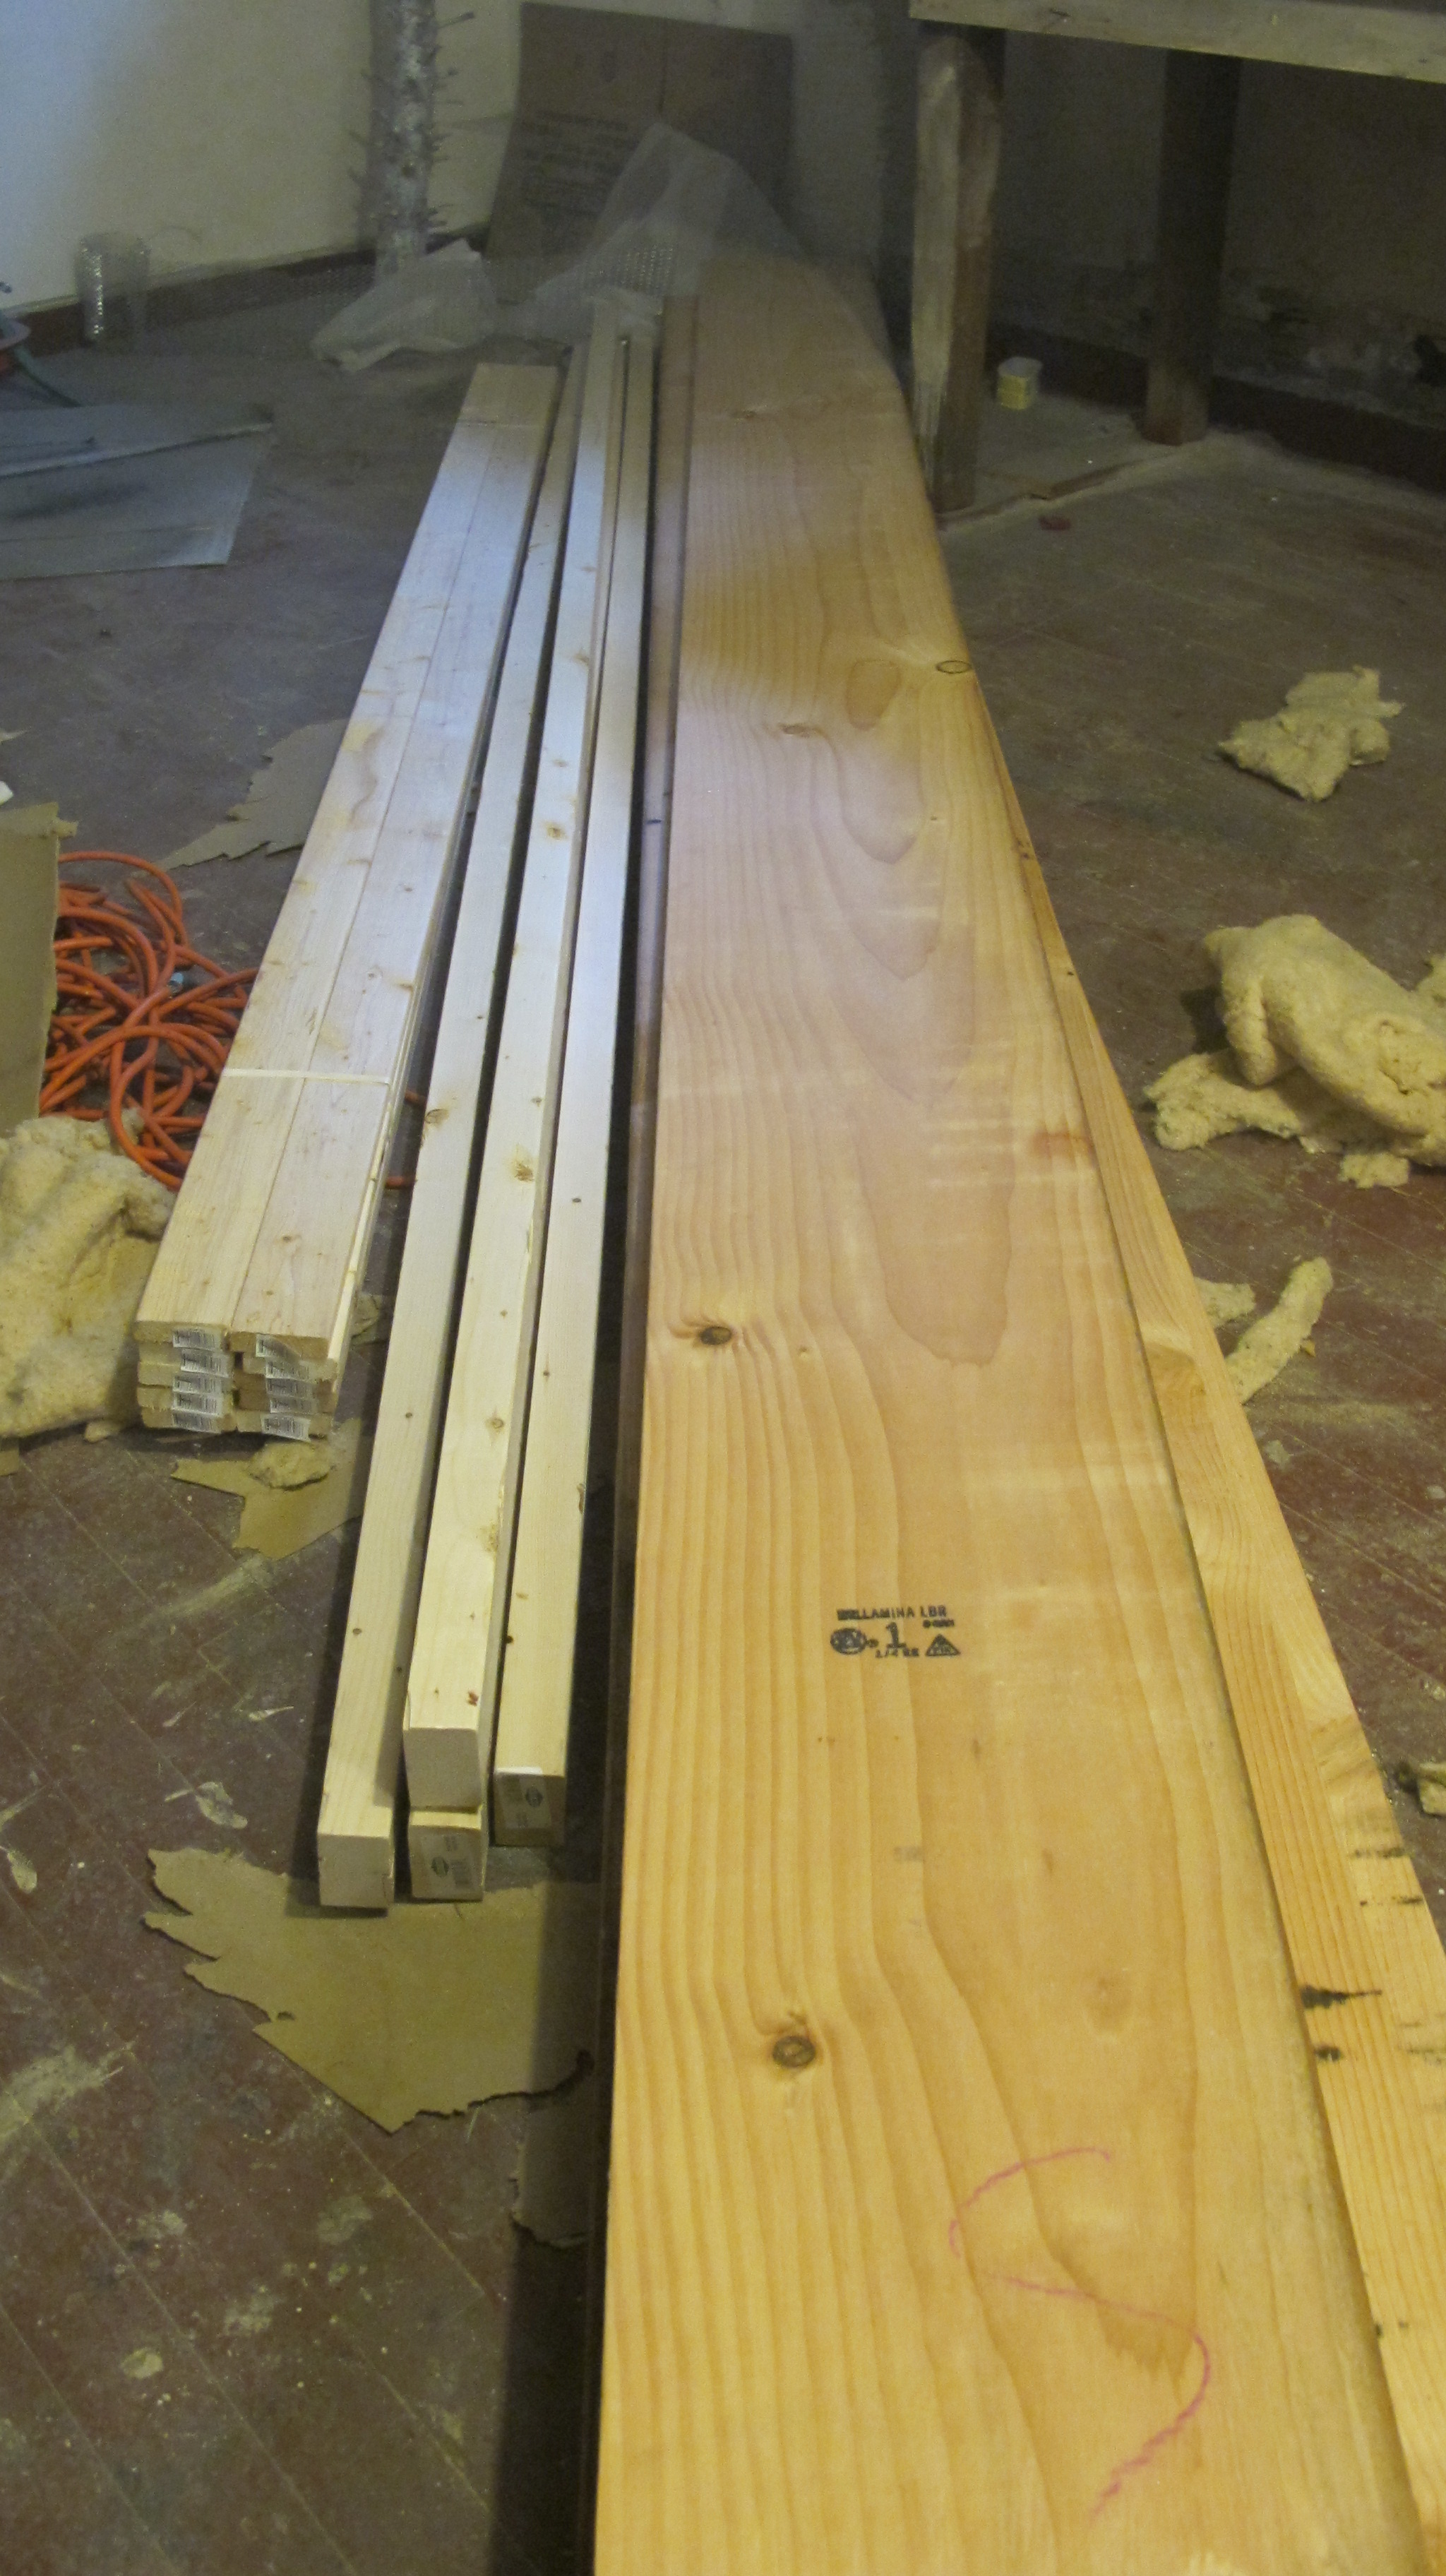
After drafting up some plans, we headed over to the True Value Lumber Yard in the Bronx and picked up some wood. It was a bit intimidating coming home with just a few pieces of wood and thinking we could whip it up into an actual bed. A bed we would sleep in that wouldn't come crashing to the floor in the middle of the night!

You can see from the photos how intimidating this was! But we measured a thousand times, and were convinced we can make magic!. The first step we took was creating the bedframe. The actual piece which would hold the boxspring and mattress. All of the details we will walk through are that of a king size bed.

Here is what we did, how we did it and what it cost:

80"X83" is the frame of the box spring: 2"X12" (at about 8 feet long) wood is what we purchased 1 piece for the foot of the bed and 2 piece for the sides.

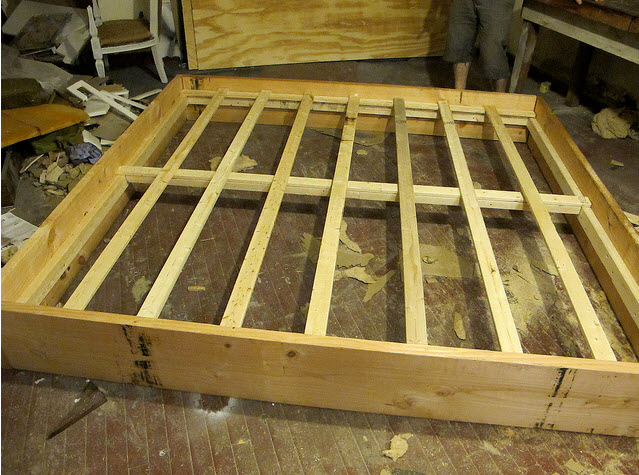
For stability of the boxspring we bought 2"X4" at about 8 feet long to frame the inside of the 2"X12" then laid the 1"X4" over the 2"X"4 like this:

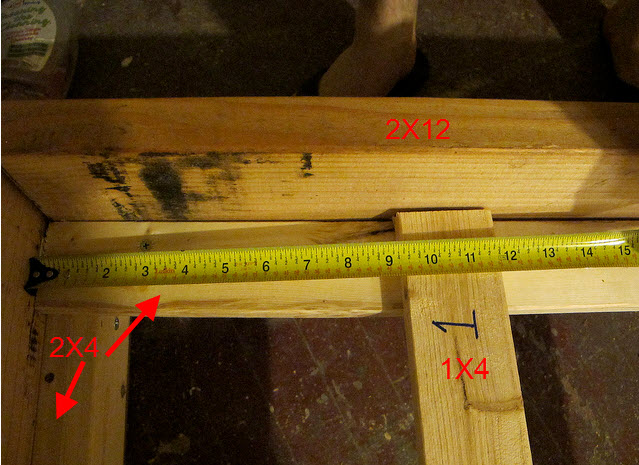
Even though this part is the part no one will see, it is super important to built this nice and sturdy! We used wood screws to attached everything with a drill. At this point make triangle supports - but do NOT attach them yet. Right now we are just laying out, measuring, and using screws to assemble to ensure perfection. Here is what you want to accomplish at this point:

The 2"X12" wood will show when we are done, but not how you see it here. We decided to upholster the bed and headboard. At this point we are focusing on the stability of the bedframe. Is it secure?

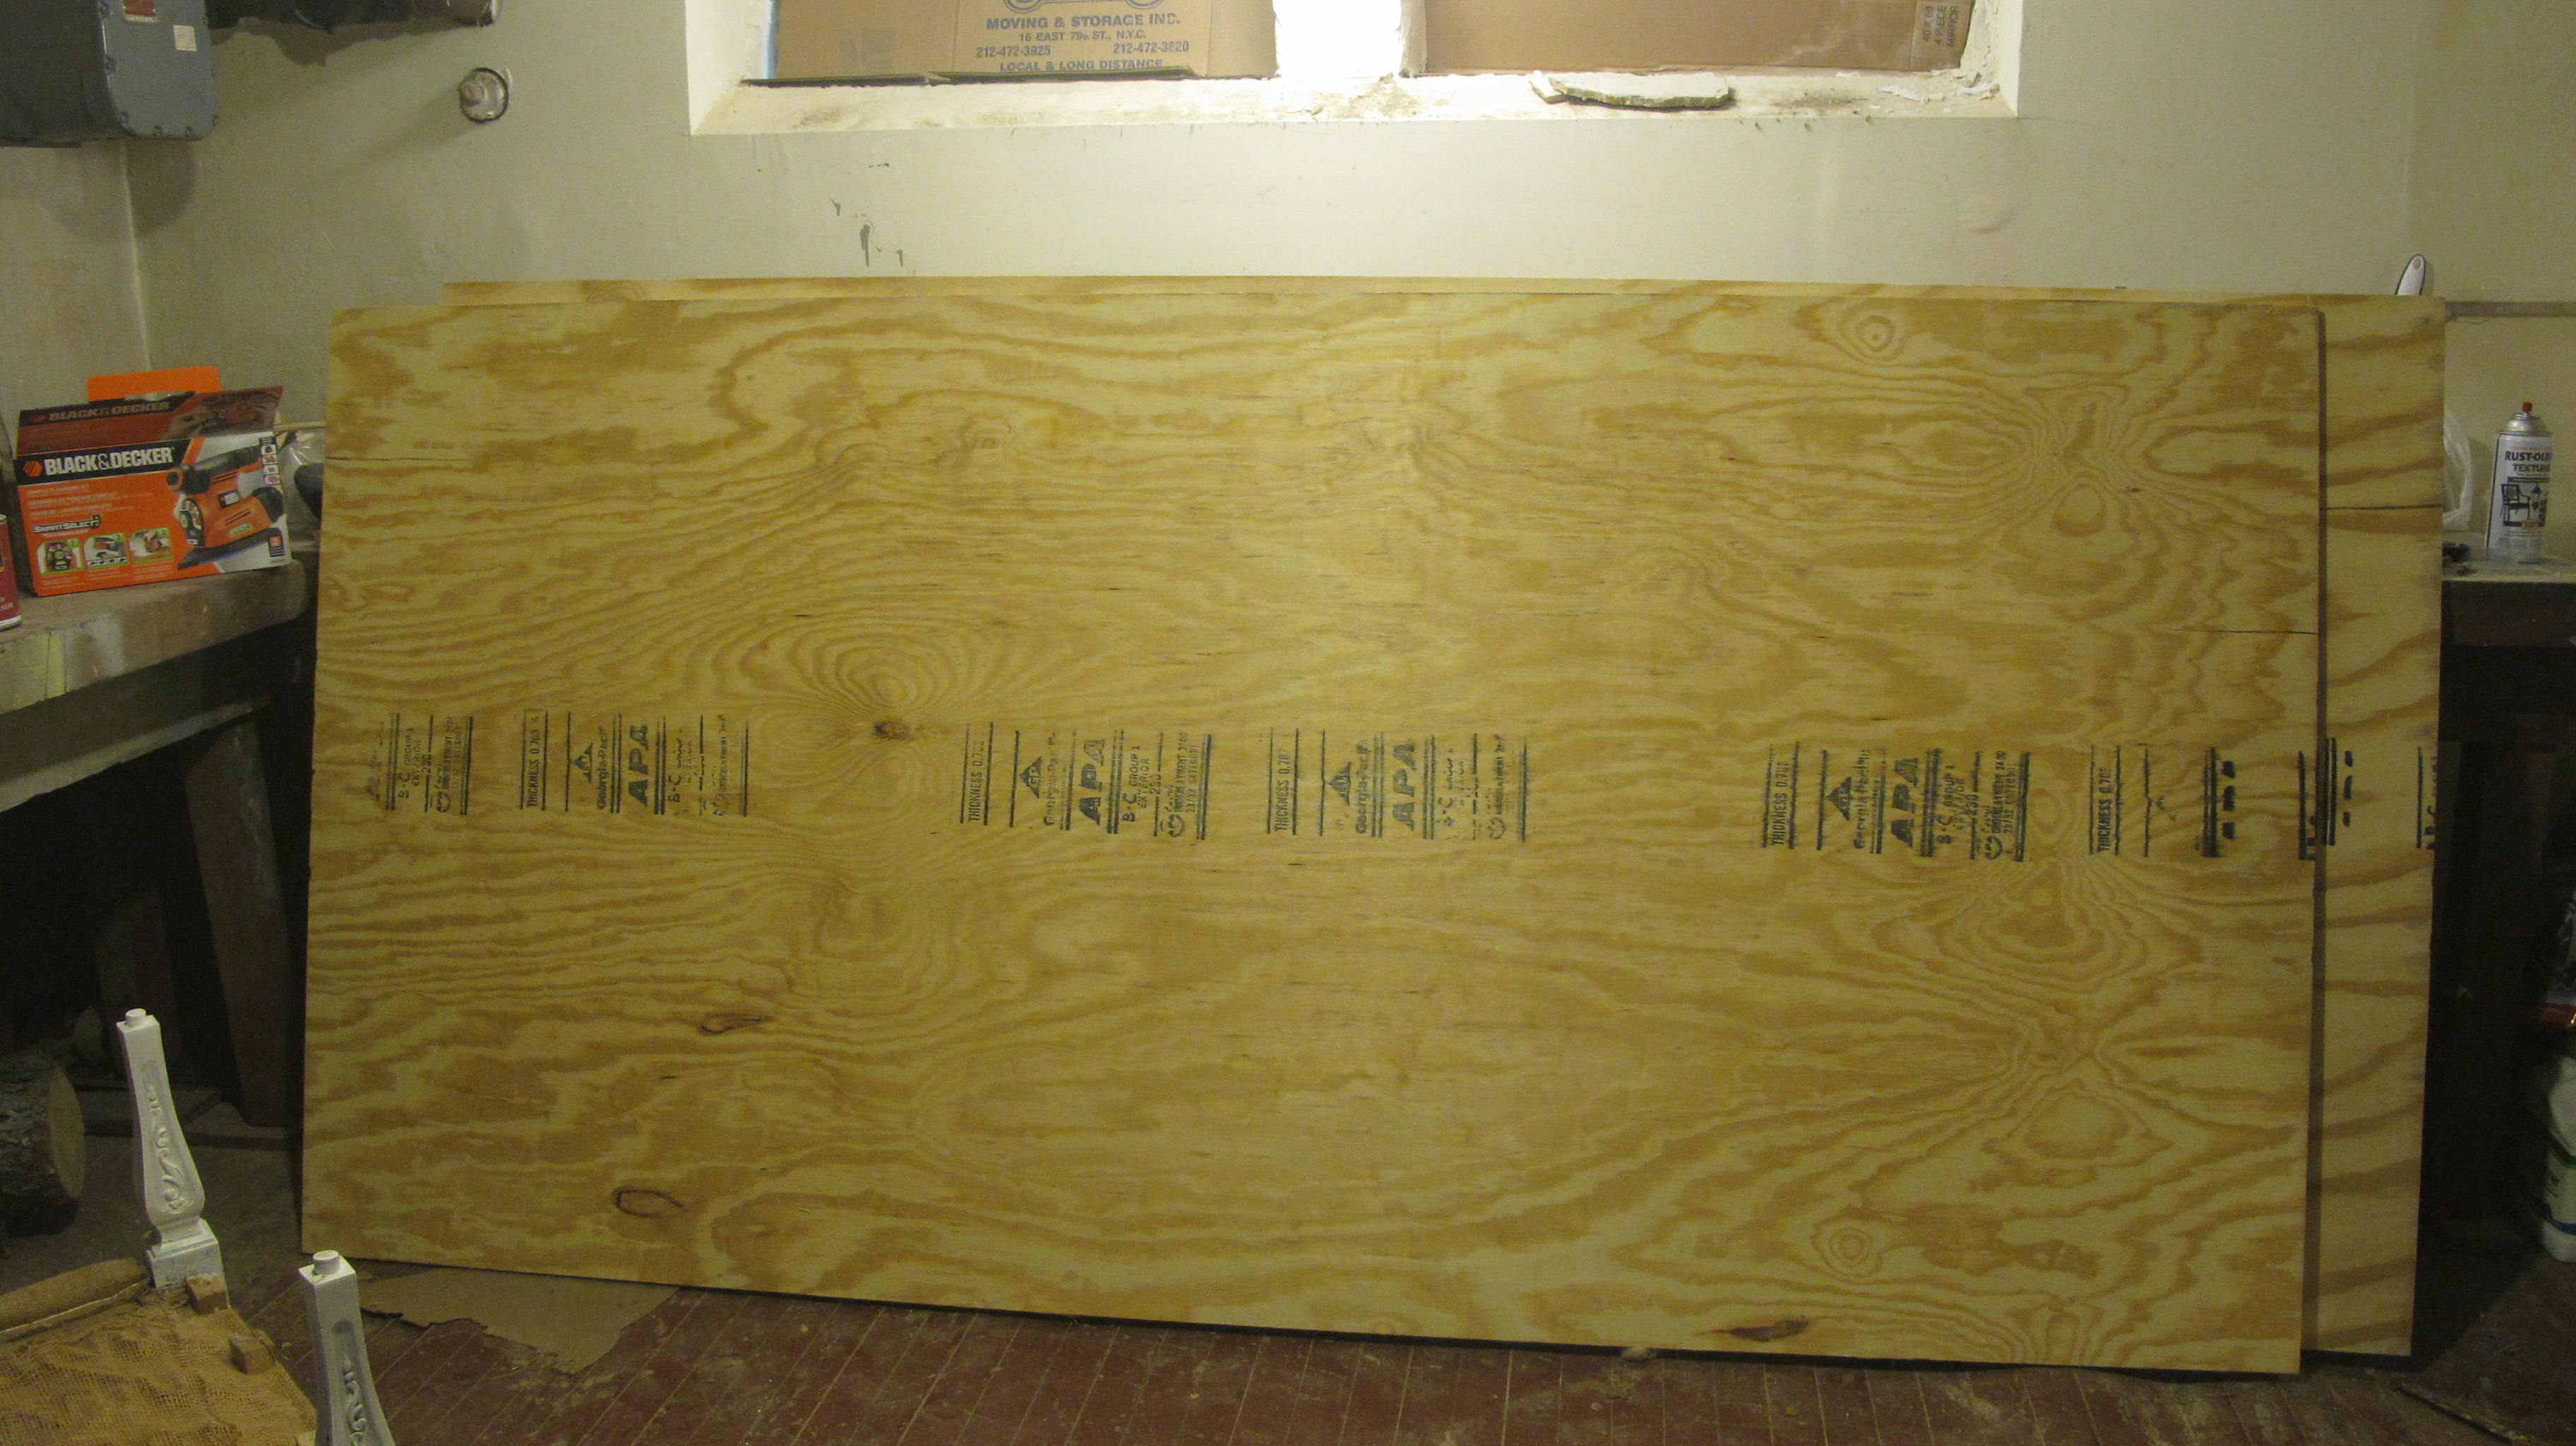
So there you go! Step numbro uno! Now the wood looks like something! Next step is to buy the wood for the headboard. We purchased two 8ft X 4ft (3/4 inch thick) plywood. Now is a good time to pick out the fabric you are going to use to upholster the bed along with a nice thick foam and batting. Also pick up some spray glue and upholstery grade thread and needles.

So once again, your True Value Shopping list is:

2"X12" wood X 3 at about 8 ft long (you will have to cut)

2"X4" wood  X 3 at about 8 ft long (you won't need all of it, you will have to cut to size of the 2"X12")

1"X4" wood bundle of 8 8 ft long (we didn't use them all)

Wood Screws 1 Box of each:  2 1/2 in and 1 1/12 in

2 8ft X 4ft (3/4 inch thick) plywood

We also suggest: tape measurer, level, thick pencils and sharpies to mark wood

Lets get legal: We were one of the 10 bloggers True Value has chosen to work on The Blog Squad , and we are way excited to take on the challenge of showing you exciting DIY projects.  They have compensated us for our time and writing, and provided materials for the projects we have worked on. However, our opinions are entirely our own and we have not been paid to publish positive comments. Did we mention we are excited to show you our DIY Blog Squad Projects?

Wednesday
Nov172010

Fireplace Facelift: A (semi) Quicky blog Squad Project

Good morning, friends! We have a few fireplaces in our home. Well, more like four. Ok, wait, three. See, the one is the basement is for "show". Kinda weird, right? A faux basement fireplace....wonder what they were thinking when that happened. So the three real fireplace are in the living room, master bedroom, and my office. We were very excited about all the fire places when we moved in. We actively use the one in the master suite, and the one in the living room. We have plans for the living room one, kinda massive plans, but the rest will pretty much stay "as is"...almost. We liked the brick texture in the master bedroom, however the "red brick-ness" didn't quite fit into out master plans. So we decided to give her a 'lil face lift. First we thought painting it white would be good enough. Fail. After a few days I hated it.  Take a look.

So we figured out how to "rectify" the situation, and wound up with something we seriously love and absolutely fits in with what we are trying to do. Painting a brick fireplace is kind of scary. We aren't going to lie. It's a little permanent to be honest. But we are going to show you what to do, how to do it, and what it costs.

We started with the following:

1-2 paintbrushes - $2

Kilz sealer - $6

Easy Care semi Gloss in white- $8

Plastic tarp - $3

Paint pan - $2

Mini Roller - $3

Total for round: $24

We got all of our items at True Value, as well as advice on which brands would work best for this project. The fine people at True Value warned us that if we were going to paint brick, it was going to stick. They also advised us that the brands above were safe to paint the outside of a fireplace.

As you can see above, step 1 is pretty simple. Brush off any debris, and clean the area before priming. Paint the fireplace and let it dry for at least 24 hours. We believe in taping stuff off and suggest you do too if you like clean lines and ensuring not to paint the mantel or wall. 


So you can see getting from step one to two is pretty easy. Getting from step two to three takes a little more work, but is so worth it. Joey figured out about half way through that spraying the painted brick with water helped the process of sanding. We tried a blow dryer before that, and it didn't help much. We used a Milwaukee hand sander, and a dozen rough 60 grain pads to "rough her up" once it was completely dry. 

It took about a solid hour to buff through the perfectly painted white paint, and transform it into more of an aged and weathered look. But here is our shiny new fireplace we love!

We have some styling to do around the fireplace, but now we are totally happy with the results of it's new look. We encourage you to not be scared and go for it. It was really simple. The hardest part is making the decision! Once you do, stop by your True Value and ask a friendly face to walk you through the process and you'll have a cheap and quick way to update your fireplace too.

Lets get legal: We were one of the 10 bloggers True Value has chosen to work on The Blog Squad , and we are way excited to take on the challenge of showing you exciting DIY projects.  They have compensated us for our time and writing, and provided materials for the projects we have worked on. However, our opinions are entirely our own and we have not been paid to publish positive comments. Did we mention we are excited to show you our DIY Blog Squad Projects?


Wednesday
Nov102010

Perfect *Give-Away* for the Holidays

We were super excited when the fine people over at Silhouette contacted us and asked us to host this give away! They also have a great blog with tons of great project ideas! They graced us with a package of goodies to see what creative-ness we could come up with, we rose to the challange, and have this to show for it:

The magnet sheets are super easy. You feed them into your printer just like normal paper. We had the idea to make words to play with on a metal storage case we have and our fridge. We also printed out some owl art we loved to put on metal cans we are using as "gift bags" this season.

So, like we mentioned, you simply print these babies up and use them! See the photo below, and you'll agree it's as simple as printing paper!


 Prize: Win this $50 package from Silhouette


1.  A make your own tattoo kit

2.  Make your own magnets

3.  White Heat Transfer paper

4.  Yellow Heat Transfer paper

How to enter: Leave a comment below with the words "DIY Fun!" You must enter by November 13th at 11:59pm OR fill out the form to the right "Give-Away Entry" to be entered in ALL our give-aways!

Winner announced:  November 14th on the blog, so come back and check!

The Details: Open to US residence only.Winner picked using random.org. Only one winner allowed (even if you see this give-away on another site!)


Bonus!!**Silhouette is also offering 25% off on all their accessories with the code: JOEY
{Runs through November 13th at midnight!}